
Preparing to wash your car is just as important as the wash itself. Begin by choosing a shady spot. This prevents the sun from drying the soap too quickly, which can leave spots. Ensure you have all your supplies ready: a hose, two buckets (one for soapy water, one for rinsing your mitt), a high-quality car wash soap, a wash mitt, and microfiber towels.
Next, it’s crucial to understand the importance of using car-specific soap. Household detergents can strip the wax off your car and damage the paint. Invest in a soap formulated for vehicles to safeguard your car’s finish. Fill one bucket with this soap and water, following the recommended soap-to-water ratio.
Now, focus on the water. It’s best to use a hose with a nozzle that allows control over the water flow. A gentle spray is ideal for pre-rinsing and rinsing the car. Avoid high-pressure sprays which can grind dirt into the paint and cause scratches.
Before you begin washing, make sure the car is cool to the touch. Washing a hot car can result in soap drying too quickly, leaving unsightly soap residue.
Finally, mentally divide your car into sections: roof, hood, doors, sides, and rear. This systematic approach ensures you don’t miss any spots. By preparing thoroughly and methodically, you set the stage for a successful, efficient car wash that leaves your vehicle sparkling clean.
Pre-Rinse Perfection: The Key to a Clean Slate
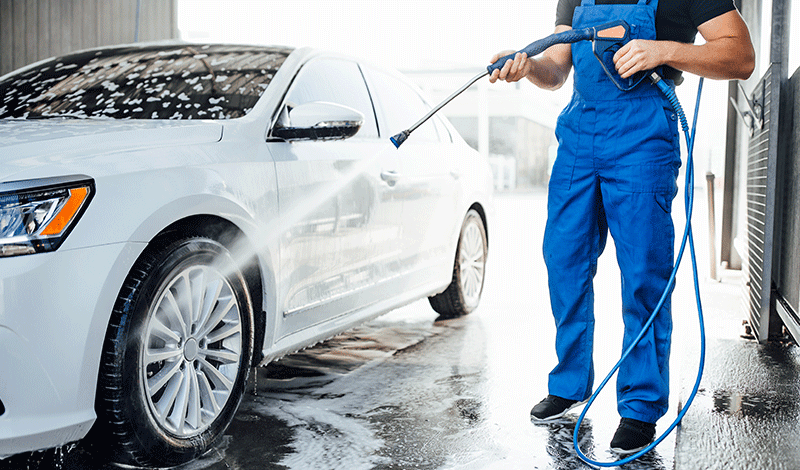
The pre-rinse is a vital step in achieving that spotless shine. It’s all about removing the loose dirt and debris before you start scrubbing. Start by rinsing the car thoroughly with a gentle stream of water. This helps to soften and lift off the dirt, making the washing process much easier and safer for your car’s paint.
Begin at the top of the car and work your way down. Gravity is your friend here, as it helps carry the dirt down off the car. Pay special attention to areas where dirt accumulates like under the wheel wells and around the bumpers. These areas might need a bit more focused rinsing.
A common mistake is to start scrubbing the car without a thorough pre-rinse. This can lead to scratches, as you end up rubbing the dirt into the paint. A proper pre-rinse ensures that you’re only washing, not scratching.
Also, don’t forget the wheels. They often harbor the most dirt and grime, so giving them a good rinse first can prevent this grime from splashing onto the clean parts of the car later. Use a separate wash mitt or brush specifically for the wheels to avoid contaminating the mitt you’ll use on the car’s body.
Remember, the goal of the pre-rinse is to make the actual wash safer and more effective. By ensuring that the majority of the dirt is rinsed away first, you’re setting yourself up for a successful, spotless car wash with minimal risk of scratching or marring the paint.
Suds Up: Choosing the Right Soap for Your Car
Now that your car is pre-rinsed, it’s time for the main event: soaping. This step is vital. The right soap can make a huge difference. Not all car soaps are created equal. Choosing the wrong one can do more harm than good.
Start by looking for a soap specifically designed for cars. Why? These soaps are formulated to be gentle on automotive paint. They also have the right pH balance to not strip away wax or sealants. A good car soap should produce plenty of suds. These suds are essential. They provide lubrication, which helps lift dirt and grime off your car’s surface.
Avoid household detergents. They may be handy, but they’re too harsh for car paint. They can strip away waxes and even damage the paint over time. Stick to automotive soaps for the best results.
Now, how to use it? First, you’ll need two buckets. One for your soap solution and one for rinsing your mitt or sponge. This is the two-bucket method. It’s a great way to avoid scratching your car. As you wash, dirt from your car gets trapped in the mitt. Rinsing it in a separate bucket removes this dirt before it goes back onto your car.
Mix the soap according to instructions. Too much soap can leave residue. Too little won’t clean effectively. Once mixed, dip your wash mitt into the soapy water and start washing. Remember to wash in sections. This prevents the soap from drying on the paint, which can leave marks.
By choosing the right soap and using it correctly, you’re ensuring that your car not only looks clean but also remains protected throughout the wash.
Scrubbing Smart: Gentle Techniques for a Deep Clean
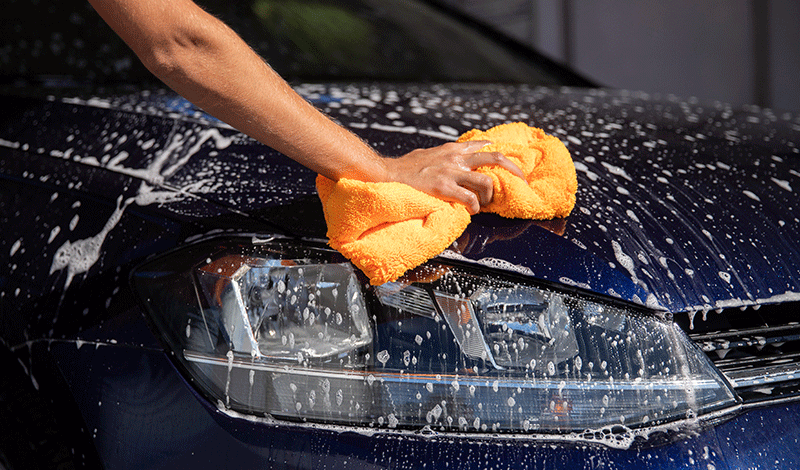
Effective car washing isn’t just about the products you use. It’s equally about the technique. Start with a high-quality, soft car wash mitt or sponge. These tools are crucial for avoiding scratches. Always work from the top down. This method ensures you’re not dragging dirt from the bottom of the car back up.
Begin with the roof. Use light, circular motions to lift the dirt away. This approach is gentler on the paint. Plus, it’s effective in loosening grime. Remember, the goal is to remove dirt, not to scrub it into the paint. So, gentle pressure is key.
Next, tackle the hood and trunk. These areas often accumulate a lot of dirt. Be thorough but gentle. Frequently rinse your mitt in clean water to remove trapped dirt. This step prevents you from rubbing this dirt back onto the car.
Now, move to the sides. Pay special attention to door handles and side mirrors. These spots can gather unexpected amounts of dirt and grime. Use a separate cloth for harder-to-reach areas. This way, you avoid spreading dirt around.
Finally, don’t forget the lower parts of the car. These areas are often the dirtiest. However, by leaving them for last, you reduce the risk of moving this heavy dirt upwards.
In summary, smart scrubbing is about technique, not force. Use a soft mitt, work top-down, and be gentle. This approach ensures a deep clean without damaging your car’s paint.
Wheel Wonders: Tips for Shiny Rims and Tires
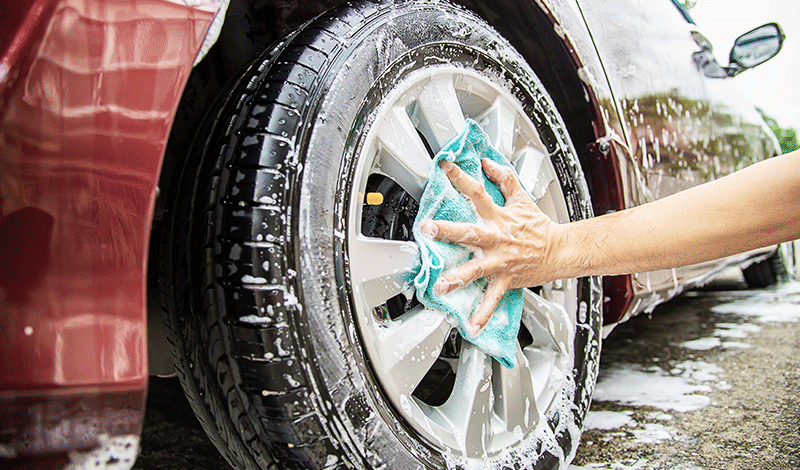
Wheels and tires are crucial for that spotless finish. Start by choosing a good quality wheel cleaner. Ensure it’s suitable for your type of rims. Always follow the product instructions. This step is essential to prevent damage.
First, rinse the wheels and tires to remove loose dirt. Then, apply the wheel cleaner. Allow it to sit for the time specified on the product. This duration lets the cleaner break down the grime and brake dust.
After the cleaner has done its work, use a soft-bristled brush. Gently scrub the rims. Reach into all the nooks and crannies. For the tires, use a different, stiffer brush. This differentiation ensures effective cleaning without causing damage.
Once you’ve scrubbed, rinse the wheels and tires thoroughly. Make sure to remove all traces of the cleaner. Leftover cleaner can lead to discoloration or damage.
To dry, use a microfiber towel. This material is super absorbent and gentle. It’s perfect for avoiding water spots and streaks.
Finally, consider applying a tire dressing for that extra shine. Be careful to choose one that’s not too greasy. This finishing touch will make your tires look new and enhance the overall appearance of your car.
In conclusion, clean wheels and tires are vital for a spotless car. Use the right products, gentle scrubbing techniques, and proper drying methods. This approach will ensure your wheels and tires are as shiny as the rest of your car.
Rinse and Shine: Ensuring a Streak-Free Finish
After a thorough scrub, it’s rinse time! This step is crucial for that streak-free shine. Start with a clean, gentle stream of water. It’s best to begin from the top and work your way down. This method ensures that dirt flows downwards and off your car. The goal here is to remove all soap, leaving no residue behind.
Use a hose without a nozzle for a cascading effect. This technique helps in minimizing water spots, which are often caused by heavy, direct sprays. Keep the water moving in a smooth, sweeping motion. Pay close attention to crevices where soap can hide. These spots, if not rinsed properly, can lead to streaks once the car dries.
Once you’ve thoroughly rinsed the car, take a moment to double-check. Look for any soap suds that might have been missed. It’s these small details that make a big difference in achieving that perfect shine. Remember, patience is key. A rushed rinse can ruin your hard work up to this point.
Now, for the final touch in this step – a gentle, sheeting water flow. This technique involves letting water flow over the car’s surface in a thin sheet. It’s an effective way to reduce water droplets, which are the main culprits behind water spots. The less water left on the car, the fewer spots you’ll have to deal with. And just like that, you’re set for a spotless, streak-free finish!
Drying Do’s and Don’ts: Avoiding Water Spots
Drying your car is as important as washing it. The way you dry can either enhance your car’s shine or leave it with unsightly spots. First off, never let your car air-dry. Air drying can cause water spots, which are hard to remove and can dull your car’s paint.
Start with a clean, microfiber towel. These towels are gentle on paint and highly absorbent. They can soak up water without scratching your car’s surface. Begin at the top and work your way down. This approach ensures that you’re not dragging dirt from the bottom onto the clean, upper parts of your car.
Replace towels as they get wet. A saturated towel won’t pick up water effectively and might leave streaks. It’s good to have a few towels on hand for this reason. Be gentle – don’t rub hard. Blot or lightly drag the towel over the car’s surface. Rubbing can cause tiny scratches or swirl marks on your car’s finish.
Pay special attention to crevices and hidden spots. Water likes to hide in these areas and can cause spots if not dried properly. Use a separate, smaller towel for these tight spots. It’s all about being thorough and meticulous.
For the final step, consider using a quick detail spray. This spray can be applied after drying for extra shine. It also helps in removing any residual water spots. Just spray on and wipe off with a clean, dry microfiber towel. This last touch adds an extra layer of shine and protection, leaving your car looking spotless and radiant.
Detailing Delights: Inside Tricks for a Polished Look

Detailing your car is like giving it a spa day. It’s all about focusing on the small details that make a big difference. Start with the interior. Clear out any trash or personal items. Vacuum the seats, floors, and mats thoroughly. Remember, every nook and cranny counts!
Next, tackle the dashboard and console. Use a microfiber cloth and a mild cleaning solution. Be gentle! You want to clean without causing any damage. Don’t forget the steering wheel and gear shift. These areas can collect a lot of dirt and germs.
Moving to the windows, clean them inside and out. Streak-free glass cleaner is your best friend here. It leaves your windows shining and improves visibility. For mirrors, use the same approach. A clear view is essential for safety.
Now, the fun part – the little touches. Condition your leather seats if you have them. This keeps the leather soft and prevents cracking. For fabric seats, a fabric cleaner can do wonders. It helps remove stains and refreshes the material.
Lastly, add an air freshener. This step is like the cherry on top. It leaves your car smelling great and feeling brand new. Remember, detailing isn’t just about cleaning. It’s about caring for your car and enjoying the ride.
Protect and Preserve: Applying Wax like a Pro
Applying wax to your car isn’t just about making it shine. It’s about protecting your paint job from the elements. First, choose the right wax. There are many types, but a good quality carnauba wax is a popular choice.
Before you start, make sure your car is clean and dry. Any dirt or moisture can interfere with the waxing process. Apply the wax in a shaded area. Direct sunlight can cause the wax to dry too quickly.
Now, take a foam applicator or a microfiber cloth. Apply the wax in a small, circular motion. Think of it as massaging your car. Cover every inch, but don’t apply too much pressure. You want to be gentle yet thorough.
Once you’ve covered the whole car, let the wax dry. This usually takes about 10 to 20 minutes. You’ll know it’s ready when it feels hazy to the touch. Now, take a clean microfiber cloth and buff the wax off. This step requires some elbow grease, but it’s worth it.
Buff in a circular motion until the haze disappears. What you’re left with is a brilliant, protective shine. This shine isn’t just for looks. It protects your paint from UV rays, rain, and dirt. It’s like sunscreen for your car!
Waxing your car regularly can extend the life of your paint job. It’s an investment in your car’s future. Plus, there’s something incredibly satisfying about seeing your car look its best. So, take the time to wax. Your car deserves it, and so do you.
Final Flourish: Quick Touch-Ups for Lasting Brilliance
After meticulously washing and waxing your car, the final step is the ‘Final Flourish.’ This stage focuses on touch-ups that keep your car looking great for longer. Remember, attention to detail makes all the difference.
Start by inspecting your car closely. Look for any missed spots or areas needing extra care. Use a microfiber cloth for quick wipes. These cloths are gentle and effective, ensuring a scratch-free finish.
Next, consider the windows and mirrors. Streaks or fingerprints can detract from your car’s overall shine. Use a glass cleaner and a fresh microfiber cloth. Spray the cleaner directly onto the cloth, not the glass, to avoid overspray. Wipe in a circular motion for a streak-free finish.
Now, turn your attention to the tires. They might need a final touch-up, especially if you’ve driven the car post-wash. Apply a tire shine product using a foam applicator. It not only enhances the look but also protects the tires from cracking and fading.
Don’t forget the small details like the car’s trim and door handles. Use a clean cloth and an appropriate cleaner to give them a quick wipe. This removes any leftover wax or soap residues.
Finally, step back and view your car from different angles. This ensures you haven’t missed any spots. If needed, give a quick buff here and there. These final touch-ups might seem minor, but they play a crucial role. They ensure your car doesn’t just look clean, but also well-cared-for and polished. This extra effort extends the time between washes, keeping your car spotless and shining longer. Remember, a well-maintained car reflects your personal pride and care. Keep it shining, and it will serve you well on the roads!